Our content is reader supported, which means when you buy from links you click on, we may earn a commission.
How to Make an SRT File for Your Video
We all know how important it is to create quality videos. Anymore, a quality video also includes captions for the video so viewers can read as they follow along.
And it’s not just the hearing impaired who like following along with captions. Research from 3Play Media in 2015 showed that 54% of students reported using closed captioning from time to time.
In this blog post, we’ll teach you how to create an SRT file.
What is an SRT File?
A SubRip Subtitle file is a plain-text file that includes subtitle information. This file contains the subtitles (or words spoken) for the video as well as the start and stop times. This ensures that the subtitles are displayed at the right time in the proper sequence in the video.
Subtitles are slightly different from captions. Captions include the words spoken and any other relevant noises in the background or foreground. In many cases, captions even include who is speaking the words. Subtitles typically only include dialogue. Often the two terms are used interchangeably, but as you can see, there is a subtle difference between captions and subtitles.
An SRT file is compatible with most social media platforms and can be uploaded or shared (with the exception of Instagram and Tik Tok).
SRT files are saved with the .srt extension.
What Does an SRT File Contain?
There are four components that make up an SRT file. These components include:
- The number of the caption frame in the sequence. For example, the first caption sequence will have the number 1 written before it, the second caption sequence will have the number 2 written before it, and so on.
- Beginning and ending timecodes: The time codes are written in the format: hours:minutes:seconds,milliseconds. The two start and end timestamps are separated by – ->, which indicates the next caption sequence.
- The caption text: This is the transcripted video text that will be seen by the audience in the subtitled video.
- Blank line: A blank line is always left after a caption sequence. This indicates that the previous caption sequence has ended and a new caption sequence is beginning.
Why Use SRT Files?
SRT or .srt format is the most popular format used for subtitle files. This means that most media players, content creation software, video platforms, and video recording apps are compatible with this format.
Let’s take a look at some of the advantages of using an SRT file.
Easy to Use
SRT files require only a basic text editor to make, which eliminates the expense of buying specialized software. It is a stress-free way to add captions to videos.
To edit the file, simply open the text editor, like Notepad, make the required tweaks, and upload it. This file can be used on a variety of platforms, including YouTube.
Improved Audience Engagement
Research shows that adding subtitles to a video increases user engagement significantly.
3Play Media reported that a 2015 study showed that 59.1% of respondents who used subtitles or captions found them very helpful or even extremely helpful. Subtitles improve the comprehension of the video for people with normal hearing. That’s because all the dialogue is written out in text format. This helps viewers follow along with the speaking portions of the video.
Assists with SEO
Adding an SRT file to your video means you are adding a written version of the video, which allows search engine bots to easily crawl your content. This allows search engines to display your content in response to relevant search queries.
In addition, since SRT files increase engagement and ensure people spend more time on your videos, it sends a positive message to Google and can result in higher rankings for you.
Why Are SRT Subtitles Important?
SRT subtitles offer various benefits to viewers. Here are a few benefits:
Improved Accessibility: Many people who have subscribed to your online course or class may have hearing difficulties and disabilities. By not adding subtitles to your audio and video files, you are depriving these individuals of gaining knowledge from your platform. Adding SRT subtitles can make your videos more accessible and inclusive, which is very important.
Better Audience Connection: There are many people who prefer to watch video content with the sound lowered. This may be because of a personal preference to reduce noise pollution or to prevent unnecessary disruption in a public space.
In addition, a high percentage of people understand a content subject matter more effectively when they can follow along with the text. By offering subtitles, you can engage these groups of viewers in a better way.
Increased Accuracy: With SRT subtitles encapsulated into your video, your viewers will not misunderstand or mishear an important concept. This ensures better accuracy and more effective learning for your users.
Another great benefit of SRT subtitle files is that they can be written in multiple languages. If some of your viewers speak different languages, then it is a good idea to add multiple SRT files translated into various languages to your video. This will allow your viewers to access a range of subtitles in the language they prefer, which will increase your viewership.
How to Create an SRT File Manually
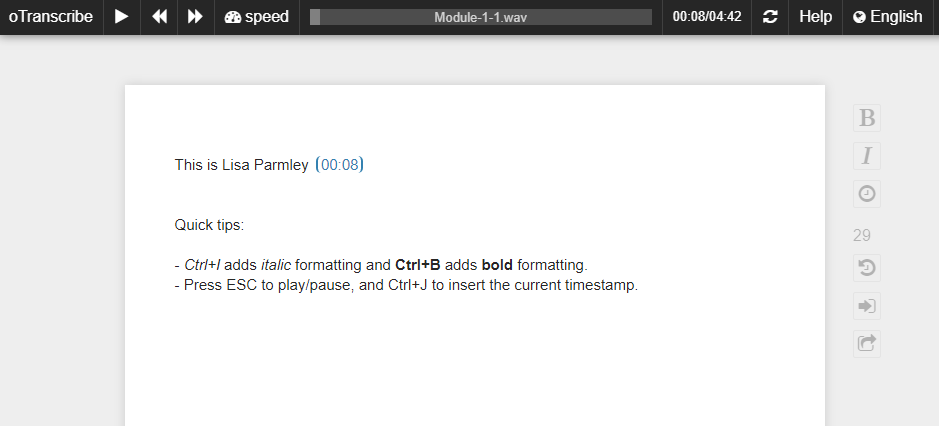
To create an SRT file manually, you will need to create a transcript for the video first. Let’s take a look at how to make SRT files on both Mac and Windows. You can also use an online program like oTranscribe which will make the process a little less tedious.
Creating SRT Files on Mac and Windows
The process of creating an SRT file on Mac and Windows is the same. However, if you work on Mac, you will use a TextEdit file, and if you work on Windows, you will use Notepad.
Here is a step-by-step process for creating an SRT file:
- Launch your text editor and open a new file on it.
- Type the number “1” to initiate the first caption sequence. Click on enter to move on.
- Add the beginning and ending timestamp by using the format: hours:minutes:seconds,milliseconds – -> hours:minutes:seconds,milliseconds
- Click “enter” when you are done.
- Start typing your subtitles in the next line. A single caption should ideally not be more than 32 characters, and a maximum of two lines can be dedicated to a caption.
- Once you have written the last line of the caption, click on “enter” twice. Leave a blank line to indicate you have started a new caption sequence.
- Type number “2” to begin the second subtitle sequence and repeat the process detailed above until the entire transcript is done.
- Click on “Format” on the toolbar above and select “Make Plain Text.” This step only applies to Mac users. Skip this step if you are working on Windows.
- Then, go to “File” and click “Save.” Type the name of your file and change its extension from .txt to .srt.
- Uncheck the “Hide Extension” and “If no extension is provided, use .txt” options on the bottom left of the menu.
- Click on “Save,” and your SRT file is ready
Create SRT Files Automatically
As you can see, the manual process is a lot of work. You can expect to spend about 2.5 minutes for each minute of audio you have.
You can also choose to create these files through automatic transcription programs. Rev.com, Otter.ai, and other tools for creating transcriptions will help you with the process of creating these files. In addition, if you’re using Camtasia, for instance, to create instructional videos, then you can use Camtasia to add closed captioning or subtitles.
Review Your Subtitles
Reviewing your subtitles is important to ensure accuracy and to catch any errors. This process also allows you to check for any missed words or phrases. You can listen to the audio of your video and read the text of your subtitles. Reviewing your subtitles can help improve the quality of your video. Be sure to check that the timing of the subtitles is correct before you publish your video; otherwise, your audience will not be able to follow along.
In addition, you may want to edit the font size, color, and position of your subtitles. You can also change the way your subtitles appear on screen by editing the timing or adding special effects. If you’re not happy with how your subtitles look, don’t be afraid to experiment until you find a style that you like.
FAQs on SRT Files
What program opens a .SRT file?
SRT files can be opened with a variety of different programs, including VLC media player, Windows Media Player, and QuickTime Player. Many subtitle editing programs will also open .SRT files, allowing users to edit the text or timing of the subtitles. In most cases, whichever program was used to create the .SRT file can also be used to open it.
How do I save a Word document as a SRT file?
To save a Word document as an SRT file, simply open the document in Word and select “Save As.” In the “Save As” dialogue box, select “SRT” from the list of available file formats. Give your file a name and click “Save.”
How do I edit an SRT file?
One option is to use a dedicated SRT editor like Subtitle Edit or Jubler. These programs offer a number of features and options for editing your subtitle file.
If you just need to make a quick change or two to your SRT file you can also do it directly in a text editor like Notepad++ or TextEdit. Just open up the file in your text editor of choice and make the changes you need to make.
Keep in mind that editing an SRT file is a bit different than editing a regular text file. Each line of dialog has specific formatting that needs to be maintained in order for the subtitles to work properly. If you’re not careful, you could end up breaking the file entirely. If you’re not confident in your ability to edit the file without messing it up, it might be best to leave it to professionals.
How do I save a text file as SRT?
To save a text file as SRT, open the file in a text editing program like Microsoft Word or Notepad. Then, go to File > Save As. In the save window that opens, give your file a name and select “SRT” from the drop-down menu next to “Save as type.”
Click save and your text file will be converted to an SRT file.
You can now open it using a video player like VLC Media Player or Windows Media Player. If you need to edit your SRT file, simply open it in a text editor and make the changes you want. When you’re finished, save the file and it will be updated with your changes.
How do I add subtitles to a SRT file?
If you want to add subtitles to an SRT file, there are a few things you need to do. First, open the SRT file in a text editor. Then, add the following lines at the top of the file:
[INFORMATION]
Title=My Subtitles
Language=eng
You can replace “eng” with the two-letter code for your language. Next, add your subtitle entries below the [INFORMATION] section. Each entry should look like this:
1
00:00:01,000 –> 00:00:02,000
Subtitle text goes here.
The first number is the start timecode, followed by the end timecode. The text in between is your subtitle text. You can add as many entries as you want. When you’re done, save the file.
How do I burn a SRT file to MP4?
If you have an SRT file that you want to burn to MP4, there are a few different ways you can go about it. One option is to use a video editing program like Adobe Premiere or Sony Vegas. These programs allow you to import both video and subtitles, and then export the final product as an MP4 file. Another option is to use a dedicated subtitle-burning program like SubtitleBurner.
This type of program will take your SRT file and burn the subtitles directly onto the video, making it easy to create an MP4 file with working subtitles. Finally, some DVD authoring programs also have the ability to burn subtitles into MP4 files. If you’re using one of these programs, simply import your video and SRT file, and then follow the prompts to burn the subtitles into the final MP4 file.
How do I add SRT file to video?
To add an SRT file to a video, you will need a video editing program that supports the SRT format. Once you have your video editing software open, import the video file you want to add subtitles to. Next, locate the SRT file that you wish to use and add it to the video project. Finally, position the SRT file so that it appears at the bottom of the screen and export the revised video.
Bottom Line
Now that you know how to make an SRT file, go out and start creating them for all of your videos. This will allow people with hearing challenges to enjoy or learn from your videos as well as increase comprehension for all your viewers.
Once you get the hang of it, making SRT files will be quick and simple!
