Our content is reader supported, which means when you buy from links you click on, we may earn a commission.
How to Remove Background Noise from Audio Recording [Using Audacity or Camtasia]

Are you an online course creator looking for ways to improve the audio quality of your recordings? Or are you an audio producer who is struggling to remove background noise from your recordings? If so, this blog post is for you.
We discuss some tips and tricks that can help you improve the sound quality of your recordings and remove unwanted background noise.
So, without further ado, let’s get started!
Why Remove Background Noise
It is important to remove background noise when recording audio, regardless of what purpose you have in mind.
Here’s why:
- Background noise is annoying. It’s distracting and can make it difficult to focus on what the recording is saying.
- Background noise can make it difficult to edit audio. You’ll need to take some time to go through all of your recordings and get them ready for release.
- Background noise can turn people off from watching or listening. If your audience can’t understand what’s being said, even with subtitles and closed captioning, they’re likely to tune out completely.
- Background noise can make you look unprofessional. It can undermine the message you’re trying to send. Make sure your audio is clear and concise to show that you care about the quality of your communications.
So, while it can be tedious, taking a few extra steps to remove background noise isn’t only beneficial but also expected of any audio or video format.
How to Prevent Background Noise
Even the most expensive equipment and software can’t filter out all the ambient noise in a room. So, it’s important to prevent background noise in your recordings.
Below are some tips and tricks to try:
Optimize Your Recording Space
Just because you don’t have a recording studio, that doesn’t mean you can’t have high-quality audio recordings. You can maximize the acoustic properties of any space as long as you keep these key things in mind:
- Choose a quiet location. Avoid recording in areas with a lot of background noise. Rooms with any door or window access to a busy street or a lot of echo feedback are out of the question.
- Use sound-absorbing materials. This can be anything from hanging blankets around the recording area to foam panels on the walls. Line your recording space with carpets, towels, or other materials that can help absorb sound.
- Huddle everyone together. If recording multiple people, have them stand close to each other to reduce the amount of background noise that gets picked up.
Use a Dynamic Mic
Dynamic mics pick up sound from a specific direction while filtering out background noise. This makes them ideal for recording in less-than-ideal conditions, like when there’s a lot of ambient noise.

You may need to experiment with different mic placements to find the sweet spot that gives you the best sound quality.
On top of this, you might also want to consider using a pop filter to help reduce background noise. Pop filters help to reduce plosives, which are the sounds made when you say certain words with a lot of force.
Turn Down the Gain & Get Close
The gain on a recording device amplifies the sound signals that the device picks up. If the gain is too high, the recording will be more susceptible to picking up background noise along with the desired sound signal.
Reducing the gain will mean that the device is less sensitive to sound and, as a result, will record less background noise.
The steps to do this may vary depending on your specific device, but in general, you will need to access the device’s settings and find the section for audio input. Within that section, you will probably see a knob or slider labeled “gain” or “sensitivity” that you can lower.
You will need to get close to your recording device or microphone to get the most out of this setting.
Eliminate Background Noise Sources
To eliminate noise, start by turning off any fans or air conditioners and closing any doors or windows that might let in outside noise.
Listen closely for other sources of noise in your environment, like a ticking clock, a buzzing lightbulb, or even an electronic device in standby mode. Try to mute these or unplug them for the time being.
Minimize Computer Fan Noise
Computers create a lot of background noise that can ruin a recording. So, when you’re using your computer to record, take notes, or read your lines, you’ll notice the biggest noise coming from your computer’s fan.
Some computers even come with noiseless fans for this reason. However, with some preparation, you won’t have to buy a new computer just because of fan noise.
Here are some sound-reduction measures you can take instead:
- First, make sure your computer is in a well-ventilated room. If it’s in a cramped space, the fan has to work harder and will be louder.
- Second, avoid using your computer on a hard surface. If you must use it on a hard surface, put something beneath it to help muffle the noise.
- Third, don’t use your computer for long periods without taking a break. The longer the fan runs, the louder it will be.
Remove Background Noise With Audacity
For this section of the guide on removing background noise, we’ll be using one of the most popular programs, Audacity. It’s a free, open-source audio editor that is versatile and easy to use.
To remove background noise from an audio recording using Audacity, follow these steps:
1. Select a Noise Sample
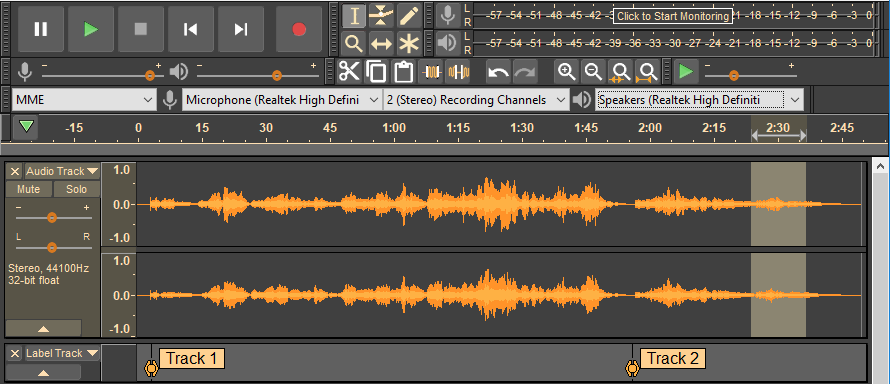
To select a noise sample, open the recording in Audacity and listen through your recording for spots where noises are especially noticeable.
Next, using the Selection tool, click and drag over a section where only the background noise is present.
To do this, zoom in on your track’s waveform and look for an uninterrupted sound. This ensures you’re not including any of the voiced sections as a noise sample.
2. Apply Noise Reduction
Once you have your sample selected, go to “Effects > Noise Reduction” and click “Get Noise Profile.”
This step should provide Audacity with a sound blueprint to isolate based on your selected noise sample.
3. Remove Background Audio Noise
With the noise profile created, just highlight the entire recording, go back to the “Effects > Noise Reduction” menu, and click “Apply.”
This will clean up all instances of the background noise you sampled from the entire recording.
Remove Background Noise With Camtasia
Camtasia is also a great option. It offers several filters, such as the noise removal tool that can quickly and easily remove background noise from audio and video files.
1. Open Video in Camtasia
First, you’ll need to import the video into Camtasia. To do this, simply go over to the Media Tab and double-click inside the Media Bin.
Once the file is imported, you’ll see it appear in the Media Bin. To begin editing, simply click the “Edit” button. This will open up the video in the editing workspace, where you can make all the necessary changes.
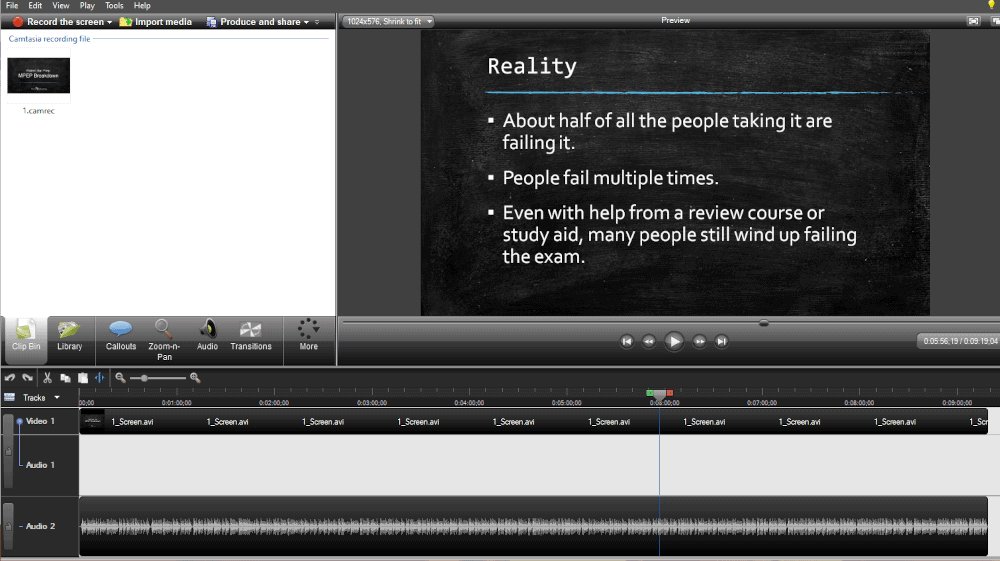
2. Separate Audio From Video
Next, if you’re working with video, you’ll want to split a video file into its audio and video components.
Select the video track, right-click to open the menu, then choose “Separate Audio and Video.” This will put the audio on a different track, and you can then edit the audio component separately.
3. Apply the Remove Noise Audio Effect
In the Audio Effects tab, select the “Noise Removal” effect and drop it onto your clip. Then, use the Sensitivity and Amount sliders to adjust the amount of noise you want to remove.
Once you are happy with the results, simply export the file as a new video or audio file.
FAQs on Removing Background Noise
What is audio editing?
Audio editing is the process of manipulating audio recordings in order to improve the quality of the recording or to change its meaning. Common audio editing tasks include removing unwanted sounds, such as breaths, coughs, and background noise; cutting out sections of the recording; and adding audio effects, such as echo and reverb. Audio editing can be performed using specialized software, such as Audacity, or even with a simple text editor.
Why is audio editing important?
Audio editing is important to remove unwanted noise, to correct errors, or to enhance the overall quality of the recording. It can be used to create a variety of different results.
For example, audio editing can be used to make a recording sound more natural, or to make it more exciting. It can also be used to make a recording more intelligible, or to change its overall tone.
What is the best app for audio editing?
If you’re looking for a simple way to trim and merge audio files, then WavePad might be the best choice. If you need more advanced features, such as the ability to add effects or change the speed of playback, then Audacity would be a better option. There are also apps designed specifically for DJs, such as Serato DJ, which provide features like beat matching and cue points.
What audio editing software do professionals use?
For audio editing software, professionals tend to use Adobe Audition, Pro Tools, Logic Pro, and Cakewalk Sonar. There are various reasons why each software is popular among professionals.
- Adobe Audition is known for its ease of use and its intuitive interface.
- Pro Tools is a popular choice for audio editors who need to work with a lot of audio files simultaneously.
- Logic Pro is another great option for professional audio editors who need advanced features and tools.
- Cakewalk Sonar is also a popular choice for audio editors because it offers a wide range of features and tools.
Does video editing include audio editing?
In most cases, video editing software will also include tools for editing audio. However, there are some exceptions. For example, some video editing software is designed specifically for handling footage from cameras that do not have audio capabilities. In these cases, the software will not include any audio editing features.
Additionally, some video editors choose to use separate software for audio and video editing. This allows them to use the best tool for each task and provides more flexibility in terms of how the final project will sound.
What is EQ in audio editing?
EQ, or equalization, is a key component of audio editing. EQ is used to adjust the balance of frequencies in an audio signal.
For example, if a track has too much low end, EQ can be used to boost the highs and bring out the midrange. Conversely, if a track has too much highs, EQ can be used to tame them and create a fuller, more balanced sound. While there are many different EQ strategies that can be employed, each one boils down to making adjustments to the levels of specific frequencies.
Wrapping Up
Background noise can be a huge distraction when trying to focus on an audio recording.
As shown in this post, there are several ways to remove background noise from audio recordings, even using free tools.
Start making your audio clearer!
