Our content is reader supported, which means when you buy from links you click on, we may earn a commission.
How to Convert PowerPoint to Google Slides: 2 Quick Methods

Thanks to the internet, long-distance learning and online school is a thing. Anyone can share their knowledge and skills by creating an online course. Today, you can find a class or tutorial on any topic under the sun. A recent report projects that online learning will hit the $370 billion mark by 2026.
PowerPoint and Google Slides are the tools of choice for most online instructors. However, learning how to convert PowerPoint to Google Slides could be something you need to do at some point or another. This article explores two different methods of converting a PowerPoint presentation to Google Slides and lists the pros and cons of each method.
Reasons for Converting PowerPoint to Google Slides
There are many reasons why you might need to convert PowerPoint to Google Slides. From never having to hit the save button to easy publishing, here are some reasons why you may choose Google Slides over PowerPoint.
Efficient Collaboration
Collaboration is one of Google slide’s most significant selling points. This feature comes in handy when creating course content. Several instructors can work together to enhance a presentation. It is also an effective tool for handling group assignments.
Once you’ve converted the document, several people can view it at once. Anybody with access to the file can edit the slides and add their contributions. Since it’s web-based, instructors can track contributions by everyone else to the presentation. So if you’re working with a team, Google Slides might be your tool of choice.
Easy Access
Google slides are free. Anyone with an email address and a decent internet connection can access this tool. You can also access all documents and presentations saved in your Google Drive.
Since the files are in the cloud, you can access the documents from any other device as long as you are online. You can also spare your team from having to download multiple PowerPoint files.
Easy Web Publishing
PowerPoint is excellent in so many ways, but publishing isn’t one of them. The process is long, often leaving many people confused. As a course creator, the ability to publish new content quickly is a huge plus.
With PowerPoint, you must first save the presentation as a web page, create an associate folder, and set the title bar. None of this is necessary when dealing with Google slides. If you want your slideshow online, then all you need is to select the file and click publish. You can copy the link and share it with everyone.
Consistency
Working with PowerPoint can be frustrating. The biggest problem is the lack of consistency. A presentation created on one computer always looks different when you open it on another device.
Converting PowerPoint to Google slides is one way to ensure consistency. All fonts, images, and animations appear the same in all versions of the file.
It’s More Interactive
Just because a class is online doesn’t mean it shouldn’t be interactive. Google slides have backchannels that allow learners to ask questions and leave comments. Since online classes are a global product, you may not be available all the time.
The Q&A feature saves all questions and comments made during the presentation. This feedback is crucial in improving your delivery and creating better content.
How to Convert PowerPoint to Google Slides
Although Google slides are easier to use, PowerPoint remains the most popular tool. However, you can still get the best of both worlds by converting PowerPoint to Google Slides. The two main methods for doing this are uploading and importing the files. Here is a step-by-step guide on each technique.
Method 1: Uploading PowerPoint to Google Slides
Uploading refers to the processing of sending files from your computer into a central server such as the internet. This is the first method of converting a PowerPoint to Google Slides. To do that, follow these steps:
1. Prepare the PowerPoint for Conversion
Not all PowerPoint features will convert to Google Slides. It is advisable to prepare your PowerPoint presentation to avoid problems later on.
- Ensure that titles are in titleholder and body texts are in body placeholders.
- Apply the proper themes.
- Ensure that the images are of good quality.
- Confirm that the links and hyperlinks work.
- Ensure the fonts used are readable.
2. Open Google Drive
You must have a Google account to access Google Drive. If you don’t already have one, set up a Google email address (Gmail). Once your email is up and running, you automatically have a Google Drive account. Click on the Google apps icons from your email to access your drive. You can make your work easier by creating a new folder.
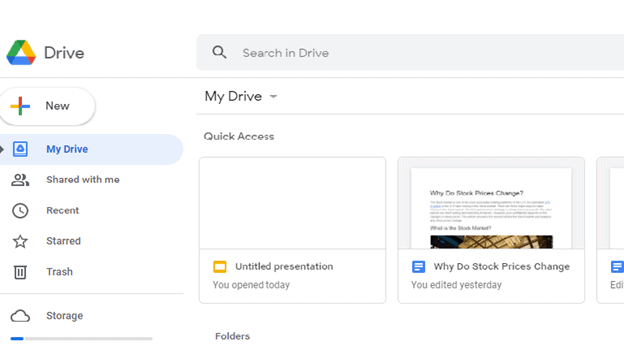
3. Upload PowerPoint to Google Drive
Documents created in PowerPoint remain on your computer. To convert the file, you must transfer it from the local storage to the cloud. There are two different ways to approach this step. The first option is longer but safer—right-click from inside the new folder you created in step one.
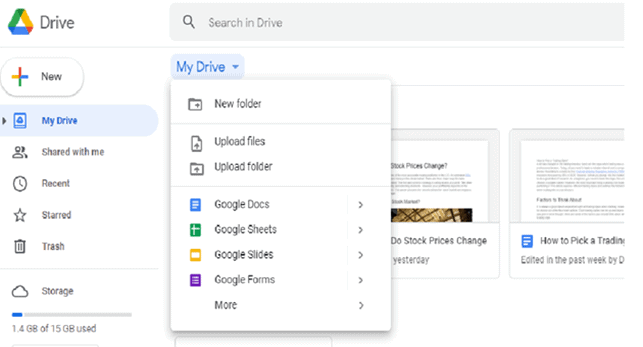
A drop-down menu will appear. Select upload files and navigate through your computer to the PowerPoint file. Select it and click open. The shorter method is to drag and drop the file into Google drive. However, you must have the two windows side by side first. Remember, the file remains in PowerPoint format after this step.
4. Open the PowerPoint File in Google Drive
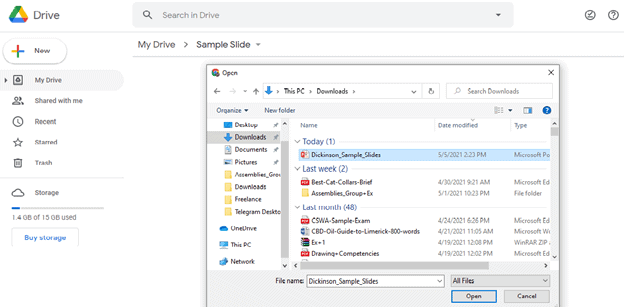
Google drive can hold different file formats, including PowerPoints. The document uploaded remains in its original format. Once uploaded, you can right-click on it and select open.
Select a Google Slides from the action menu that appears to the right. You will be able to view the PowerPoint in Google Slides. However, the file isn’t converted yet.
5. Save the Presentation in Google Slide Format
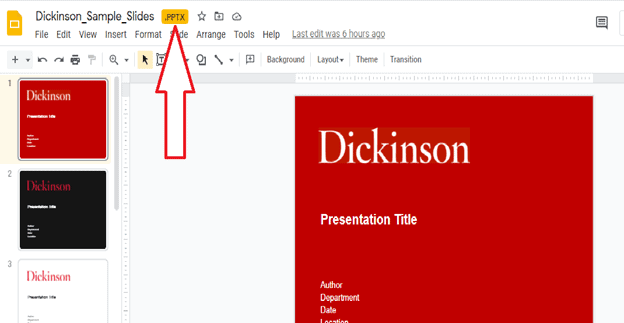
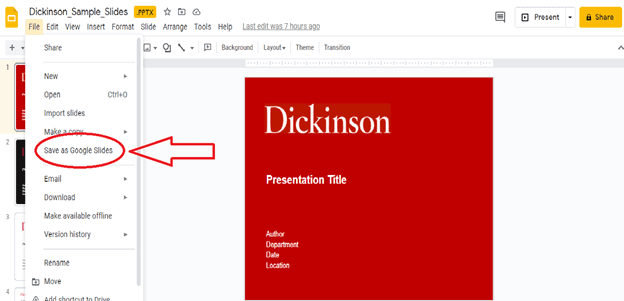
Saving the PowerPoint presentation is what converts the file. You can start this last step by clicking on the file icon on the top left of the window. A drop-down menu appears when you right-click.
Select “save as Google Slide” from the list. Doing this converts the file from PowerPoint to Google Slides. You can tell it has worked since the “PPT” file extension will disappear.
Congratulations, you have created your first Google slide!
6. Delete the Original PowerPoint
The document you just created is now saved in your Google Drive. You can access it from any device and share it with anyone. However, you now have similar files on your Google Drive folder.
You can delete the initial PowerPoint file you uploaded. Go to “My Drive” and select the file. Right-click on it to display an action menu. Clicking removes deletes the file from the drive.

Pros of this method:
- Easy to follow
- No risk of data loss because the original is automatically saved
Cons:
- Not all PowerPoint features convert to Google slide
- It is not automatic
- Requires internet connection
Method 2: Importing PowerPoint Slides into Google Slides
Uploading works, but it’s definitely the long way to do it. A shorter method is to import the slides directly into Google Slides. You can start from a blank file or add more slides to an existing Google Slide. Here is a step-by-step guide on how to import PowerPoint Slides into Google Slides.
1. Open a Blank Google Slide File
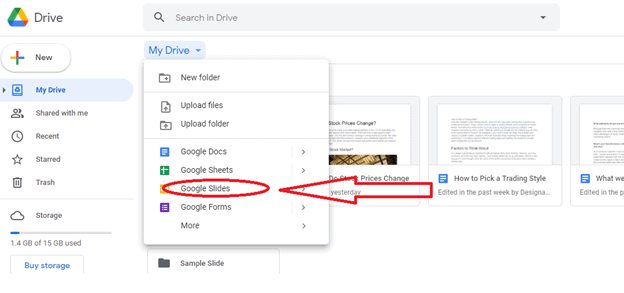
Instead of starting with a general folder, go straight away to a Google Slide. From your drive homepage, click on the drop-down blue arrow next to “MY Drive.” Another way to do this is to click the “New” tab under the Drive logo on the top left.
Select my drive from the options. Click on the smaller right arrow next to Google Slides and select blank presentation. Doing this automatically creates a blank Google Slide where you can add slides.
2. Open Import Slides
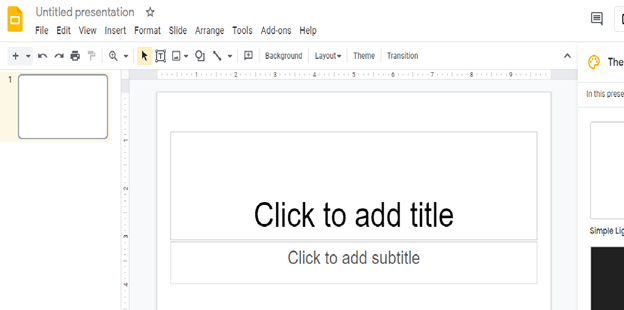
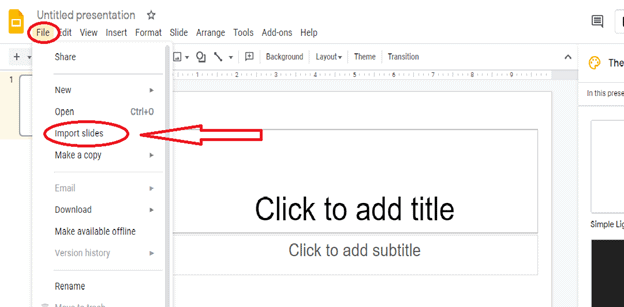
After finishing step one, you should have an empty file named “untitled presentation”. On the top left corner, there is a file icon. Click on it to reveal a drop-down menu. Click the imported slide option to begin importing slides. A dialogue box will appear where you can search for the PowerPoint you want to convert.
3. Import Slides
By now, you should be staring at a blank page. There are two options under the title “Import Slide” The default setting for this page is presented.
You can search for a PowerPoint folder and upload it. If you already uploaded the PowerPoint into Google Drive, you use the presentation option. The uploaded presentations will be visible below them.
However, if the file is still on your computer, use the upload option. A dotted box with the words “Drag a file here.” You can drag and drop the file into this box. Alternatively, you can browse your computer by clicking on the blue box.
4. Select the Slides You Want to Import
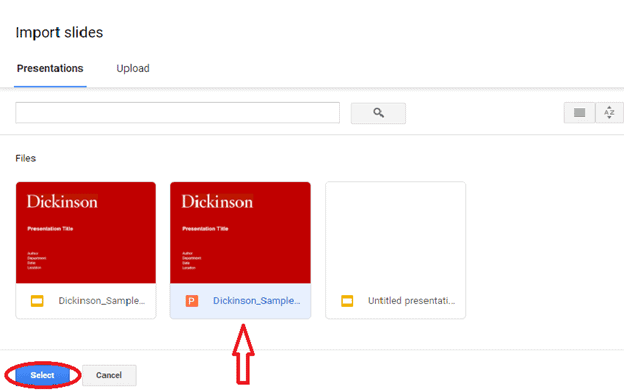
Once you’ve found the file you want to convert, all the slides will be visible. If you’re going to convert all the slides, click on import since they are all checked by default. However, if you are only interested in specific slides, browse through and uncheck what you don’t need.
You only import the checked slides into the new file. They are automatically converted to Google Slides.
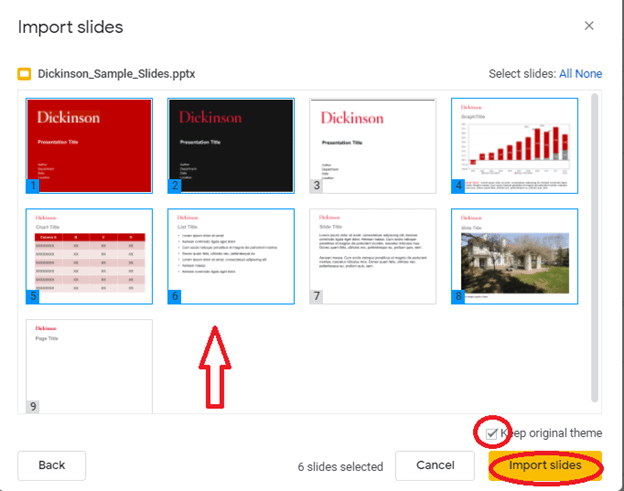
You will notice the first slide remain blank. You can click on it and delete it from the file. Before importing, you decide on the theme you want. There is a “Keep original theme” dialogue box.
If you check this box, the Google slide applies the theme used in the PowerPoint. Unchecking this box means that Google Slides applies the current theme.
Pros of this method:
- The method is direct and forward
- There is no duplication of files
- Easier to format changes after conversion
- Fewer chances of unconverted elements
Cons:
- Requires the internet to convert files
- Fewer choice of effects and transitions
Converting Google Slides to PowerPoint
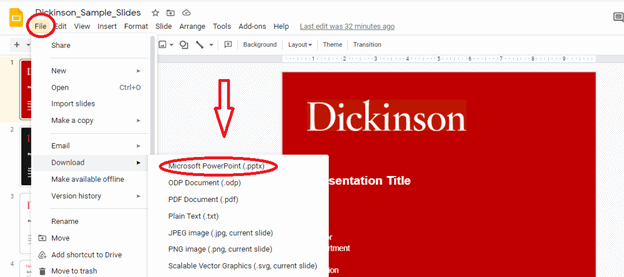
Documents stored in Google Drive are safe. They will be there long after you have lost the PowerPoint files on your local disk. To be safe, you should also learn how to convert Google Slides to PowerPoint.
- First, log into your Google Drive, as earlier explained. Navigate through the folders and select the Google Slide file you want to convert to PowerPoint.
- Open the file once you locate it on the drive. Click on the File icon on the top of the left of the screen. This will reveal a menu with several options—select download from the list.
- Clicking on the “download as” reveals another menu with another list. Here you can choose the file format you want. Select Microsoft PowerPoint. The downloaded file will be in PowerPoint format. However, the process can be tedious.
Final Thoughts
Learning to convert PowerPoint to Google slides can save you a lot of time. It can also make your course content richer and more interactive if you’re planning to give your slides to your learners or if you have a team working on them. However, it might not fully replace Microsoft PowerPoint depending on the type of slideshow you plan to put together. Chances are, you will need both when creating learning materials. We hope this article helps you convert between the two with ease.