Our content is reader supported, which means when you buy from links you click on, we may earn a commission.
How to Add Audio to PowerPoint: 3 Different Methods

Would you like to deliver incredibly captivating stand-alone presentations? Good news: you can achieve this by simply including your preferred choice of audio to your slideshow, whether it be music, sound bites, or some relevant narration.
This way you can create an automated presentation. If you end up putting it online, it will run for you 24/7. That means you can train and educate clients or employees on auto-pilot, have a sales pitch running all hours of the day, or use your presentation for any other purpose.
PowerPoint is one of the most widely-used tools for creating and delivering presentations. However, for most audiences, presentations with lots of dull static slides and endless blocks of text can be quite boring.
In this comprehensive guide, we discuss how to add audio to a PowerPoint. This is the ultimate guide for you if:
- You create online courses and would love to hook your audience with appealing stand-alone presentations.
- You’re a beginner looking to master the art of embedding audio to PowerPoint slides like the pros.
- You want to fully understand how to record your own audio or upload an existing file.
- You want to learn how to add audio on both Mac and PC machines.
Why Include Audio?
Adding audio narration to your carefully timed slides is creative, appealing, and especially useful if your audience isn’t in the same room as you.
How It Works in a Nutshell
Here’s the beauty of Microsoft PowerPoint: you can export the entire presentation as a video once you’ve included the audio narration. This is achievable through useful online course platforms like Teachable, Thinkific, and many others, where you can share and stream in a captionable, easily navigable, standard format.
However, one thing to note is that the audio is not recorded continuously. Instead, it is recorded slide-by-side. This is a considerable advantage as it allows you as the creator or instructor to re-record a slide easily should you make a mistake or just in case you want to modify things later.
1. Procedure for Windows Users
These instructions are tailored for one specific version of PowerPoint, but there’s not typically that much change between PowerPoint versions so you will still find them useful no matter what version you’re running.
How To Record Audio On PowerPoint
For this tutorial, we’ll assume you don’t have an external audio file to include in your presentation. At the same time, however, you badly want to embellish it and make it a unique, standalone piece.
First things first, ensure your microphone is enabled, and the speakers are working. If everything is set, here’s how to record your voice on PowerPoint:
1. For Starters, Design Your Presentation
Prepare your slides in the most creative and informative way you can. One trick is to limit the use of text, focusing on appropriate images to engage your audience better.
2. Select the “Slide Show” Tab
You have to be careful not to add your audio under the Insert option, as it only allows you to save your presentation as a video. The timings won’t be perfectly synchronized to move the slides automatically with the audio.
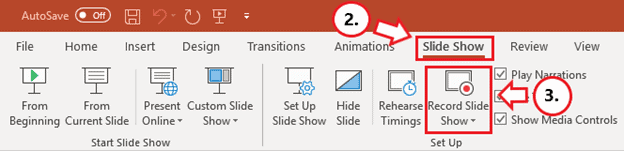
3. Click On the “Record Slide Show” Option
Older versions of PowerPoint tend to start recording automatically. However, such versions still work, although they tend to have reduced functionality.
4. Select “Record from Beginning”
This isn’t cast in stone. You could still select Record from Current Slide as your needs dictate. It’s also worth noting that you can re-record any PowerPoint slide using either of these options.
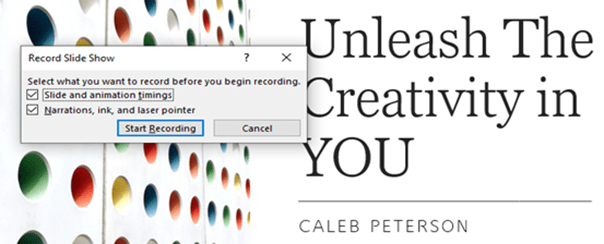
5. Click On the “Record” Icon
Naturally, this is the button with a red dot. For newer versions of PowerPoint, for example, the one in Office 2019, a dialog box will pop up, and all you need to do is click Start Recording.
Unless you’ve rehearsed and are a skilled speaker, you might be better off if you read carefully from a prepared script. In the checkboxes, PowerPoint will ask you to select what you want to record before your audio starts. Usually, these are:
- Slide and animation timings
- Narrations, ink, and laser pointer
6. Record Your Narration
Here’s how to narrate a PowerPoint:
While you record, ensure you are relaxed and avoid reading too loudly or in a monotone. You need to read at a good volume and ideally, you want to sound natural (like you’re having a conversation). You can always click the Replay button if you would like to listen to your progress or confirm whether it was recorded in the first place.
For more recent versions of PowerPoint, there’s the Repeat icon. It’s a backward-pointing arrow very similar to the Undo button you see on your text editor. If you click this, everything starts all over again on the current slide.
7. Move to the Next Slide
Once you finish recording, simply click the STOP button. It’s the middle one with a square. If you’re recording for more than one slide, click the Advance button. It will tell you to advance to the following animation or slide.
For newer versions, simply select the Next button. It’s the short forward-pointing arrow just to the left of the Pause button. Be sure to stop speaking for a second or two to prevent the audio from cutting out in the next slide. You need to do this for all slides.
8. Exit Recording
Press the Escape button (Esc) on your keyboard or simply click the X button on your screen when the recordings are complete. A speaker icon will appear on all slides that have audio.
9. Saving the Presentation
Click File and first save as a regular PowerPoint presentation with the .pptx extension.
10. Exporting the File
Select Export, then proceed to Create a Video. Although it’s optional, you should go for the Full HD (1080P). Next, choose Use Recorded Timings and Narrations and click on the icon labeled Create Video.
Follow the next pop-up window to save your video in your chosen location. You might want to monitor the progress indicator (PowerPoint won’t tell you the average time needed. You won’t receive any notification when it’s finished, either).
Add External Audio
If you’re not up to the task of recording audio directly on PowerPoint, you only need to use a supported audio file type like MP3 or WAV. Here are the detailed steps on how to add audio to PowerPoint:
1. Select a Slide
Open PowerPoint and select a slide. Click Insert.
2. Select “Audio”
Just click on that speaker icon and from the tiny dropdown menu, select Audio on My PC.
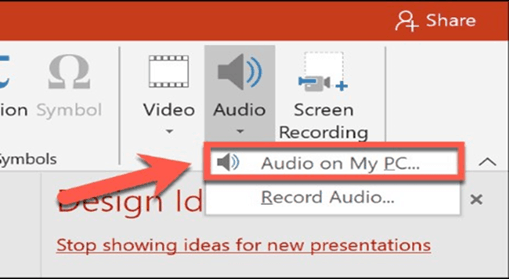
3. Locate the Audio File and Finish
Locate the audio file you want to insert from your PC and click the Insert button again.
The inserted audio appears as a speaker icon. When you select it, you will see playback options. During the presentation, simply hover over the icon to reveal playback options.
2. Procedure for Mac Users
The macOS also allows you to add audio to PowerPoint and export it as MP4.
You need the Office 365 version of PowerPoint, or you will be unable to save your presentation as a video.
What’s more, you’ll need to make sure your microphone is enabled, and your computer is appropriately equipped with a sound card. You’ll also want to hear the audio, which means you’ll need good speakers.
Let’s go through each step in detail:
1. Design Your Presentation
Use images generously to create a visually appealing presentation.
2. Select Your Slide & Click “Slide Show”
Be sure to click this tab. Be careful not to select Insert and Record Audio.
3. Select “Record Slide Show”
Click this option and press the Play button to start recording.
4. Begin Narration
It’s not advisable to read the text directly as-is on the slide. Instead, focus more on elaborating on the material.
5. Advance
Press the advance button to move to the next slide.
Pause for a few seconds and resume speaking only when the timer starts counting on the Current Slide timing feature. You’ll have to do this for all slides.
6. Finish
On your final slide, click the Pause icon, then select End Show. On the next prompt window, click yes to save your narration.
7. Check Your Audio
Click Play from Start under the Slide Show tab. Alternatively, click the presenter mode icon at the bottom of the screen.
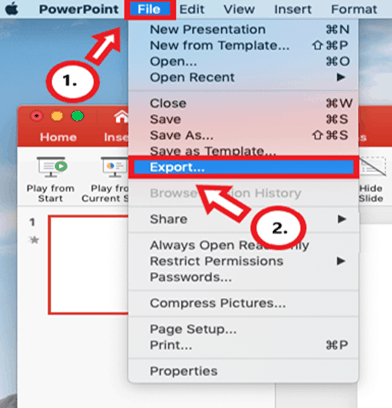
8. Save and Export
First, click File and save the presentation as an ordinary PowerPoint file.
Now select Export at the bottom of the dropdown menu and follow the subsequent prompts. On the File Format list of options, select MP4 format.
9. Finish
Select the quality you desire, then click Export. Presentation Quality takes relatively longer to export than Internet Quality, but you can monitor the progress on the indicator at the bottom of your screen.
Add External Audio
We’ll cover adding audio to a single slide enabling you to execute the same for any other slides.
1. Select Your Slide
Make sure you’re in Normal view, then select Insert.
2. Browse for Audio and Insert
Here, you can choose one of two options. Go with Audio from File if you’re choosing a local clip from your Mac.
Go with Audio Browser if you’re interested in audio from the iTunes store.
3. Customize Options
PowerPoint allows you to select your preferred audio options from the Audio Options tab.
A speaker icon will appear, and you can modify the standard audio file icon.
4. Preview the Audio
While on the current slide, select the audio icon or hover over it. You can click Play or Pause beneath it.

5. More Options
Depending on your needs, you can decide to perform more actions. For example, you might choose to play audio automatically when a slide appears, play during the whole presentation or repeatedly play (loop) during the entire presentation.
3. Alternative Method: Record Using Camtasia
You can also add audio to your PowerPoint presentation using a screencast tool such as Camtasia. Here’s a step-by-step look at how to add audio with Camtasia specifically.
First, ensure Camtasia is enabled on the PowerPoint Add-ins toolbar. It’s usually installed by default with Camtasia.
If it doesn’t appear, open PowerPoint and then:
- Go to File
- Select Options
- Click Ad-ins
- Click Manage
- Select Disabled Items on the dropdown
- Click Go and if Camtasia is disabled, click Enable
Steps for Recording
1. Prepare Slides
Make your PowerPoint without any audio. You can include any animations and run through them a time or two to make sure everything looks right. Have your presentation set up to run on your screen exactly where you want it. You will go through it with the audio in the next few steps.
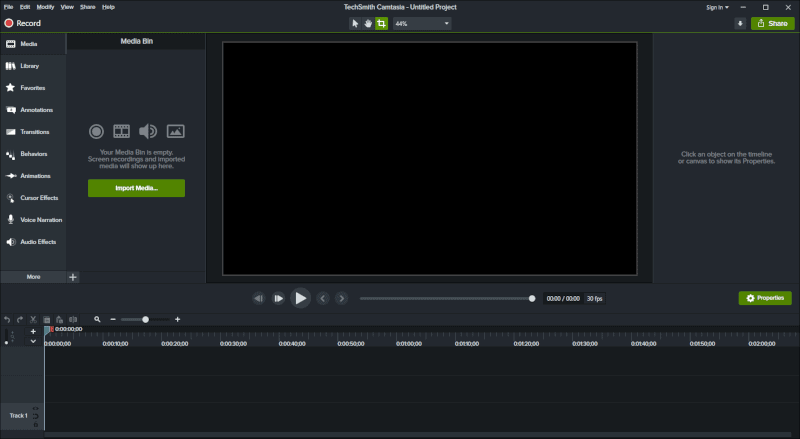
2. Open Camtasia
Open a new project with Camtasia. Then click on Record in the top left.
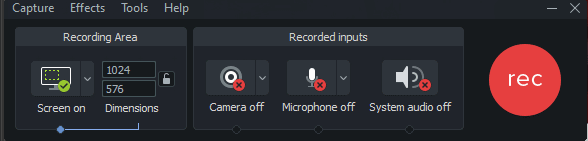
3. Set-up Your Microphone
Get whatever microphone you’re planning on using set-up and ready to go.
4. Make Sure PowerPoint is Lined up with the Camtasia Recorder
Here you can see how the recorder is set up around the PowerPoint presentation. That way the only part of the screen that is being recorded is the PowerPoint presentation. You can keep other applications open elsewhere (like if you need your speaking notes) or minimize other applications if you have a small screen.

When it’s set up exactly how you want it, click on the Record button.
5. Record Your Presentation and the Audio
Start recording your audio as you go through your presentation. You can edit out any audio errors once you are done. For now, you need to give the best version of your presentation. If you’re using a script, make sure to add some variety to your voice. Do your best to come across naturally in your presentation.
Forward the slides as you go through them. Stop the recording once you’re finished. The recording should appear on your Camtasia timeline.
6. Edit Your Recording
Now you can cut out any errors in your recording in Camtasia. This includes any visual or especially any audio errors.
Once you have the recording the way you want it, you can share it through Camtasia and produce it as an MP4 to upload online.
Wrapping Up
Whether you are a Windows 10 or Mac user, PowerPoint is vital for crafting engaging presentations. By incorporating different types of media such as audio, your PowerPoint presentation will be much more appealing to various audiences with different learning styles. Start creating your presentations and share your knowledge!
